Quick Start: Your First Animation
Create your first animation in under 5 minutes. This tutorial walks you through creating a simple button fade-in animation from start to finish.
Step 1: Create GraphFlow Asset
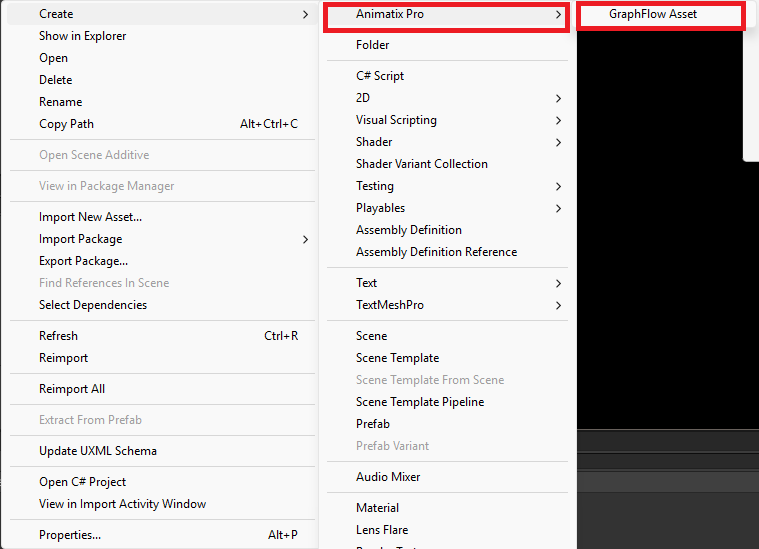
- In Unity's Project window, right-click in an empty area
- Navigate to Create → Animatix Pro → GraphFlow Asset
- Name the asset
ButtonFadeIn(or any name you prefer) - Double-click the asset to open it in the GraphFlow Editor
The GraphFlow Editor will open in a new window, showing an empty graph canvas where you'll build your animation.
Creating a new GraphFlow Asset from the Project window context menu
Step 2: Add Nodes
Now you'll add the nodes that make up your animation sequence.
Add Trigger Node:
- Right-click anywhere in the graph canvas
- Navigate to Add Node → Trigger → On Start
- An "On Start" trigger node will appear on the canvas
Add Animation Node:
- Right-click in the graph canvas again
- Navigate to Add Node → Animation → Fade
- A "Fade" animation node will appear
Connect the Nodes:
- Hover over the output port (right side) of the "On Start" node
- Click and drag to the input port (left side) of the "Fade" node
- Release to create the connection
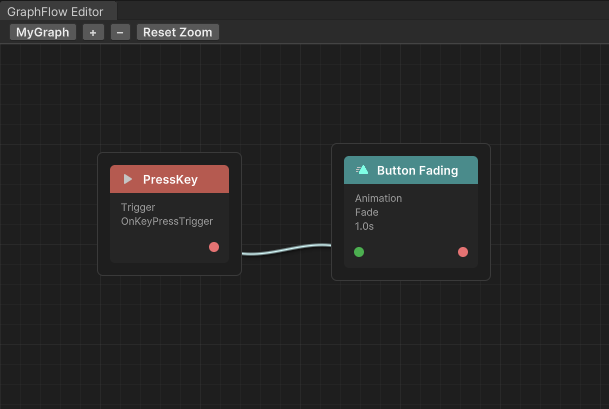
You now have a basic flow: On Start → Fade
GraphFlow editor showing On Start trigger connected to Fade animation node
Step 3: Configure the Animation
With your nodes connected, configure the Fade animation to create the desired effect.
Select the Fade Node:
- Click on the "Fade" animation node to select it
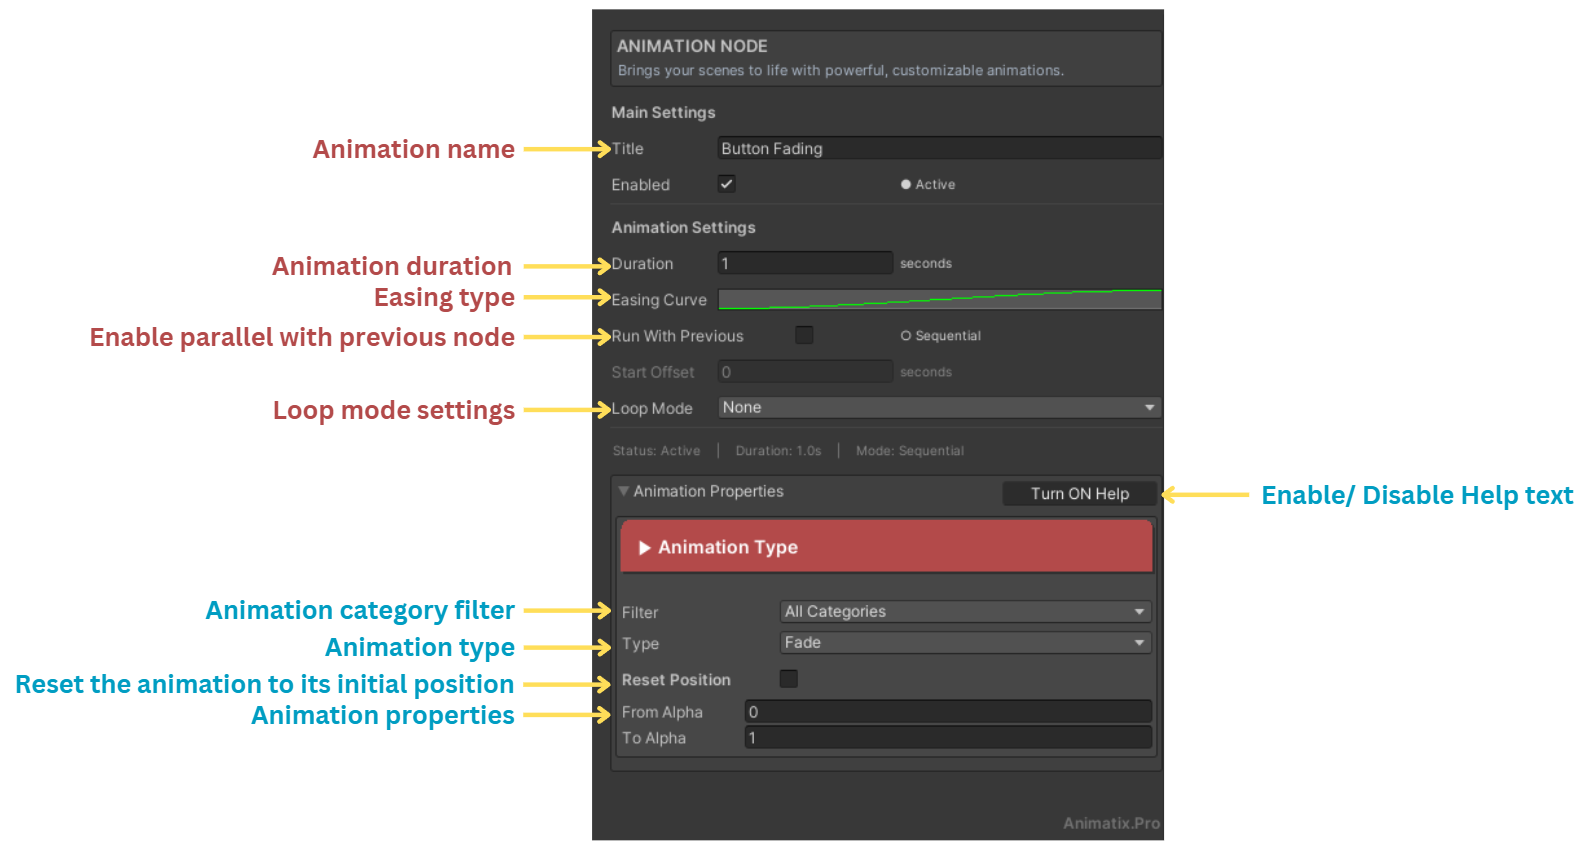
- The Inspector window will show all the Fade node's properties
Configure Fade Settings:
In the Inspector, set the following values:
| Property | Value | Description |
|---|---|---|
| Duration | 1.0 | Animation will take 1 second to complete |
| Fade Start | 0.0 | Starting transparency (invisible) |
| Fade End | 1.0 | Ending transparency (fully visible) |
| Easing | Ease In Out | Smooth acceleration and deceleration |
Optional Settings:
- Delay Before: Leave at
0.0for immediate start - Delay After: Leave at
0.0for immediate completion - Update Method: Keep as
LateUpdate(default)
Inspector showing Fade node properties and configuration
Step 4: Attach GraphExecutor to Target
Now you'll connect your graph to a GameObject in your scene so it can run.
Prepare Your Scene:
- Create or select a UI Button in your scene
- If you don't have a button: GameObject → UI → Button
- Position it where you want it visible
Add GraphExecutor Component:
- Select your Button GameObject in the Hierarchy
- In the Inspector, click Add Component
- Search for "GraphExecutor" or navigate to Animatix Pro → GraphExecutor
- The GraphExecutor component will be added to your button
Assign the Graph Asset:
- With the GraphExecutor component selected in the Inspector
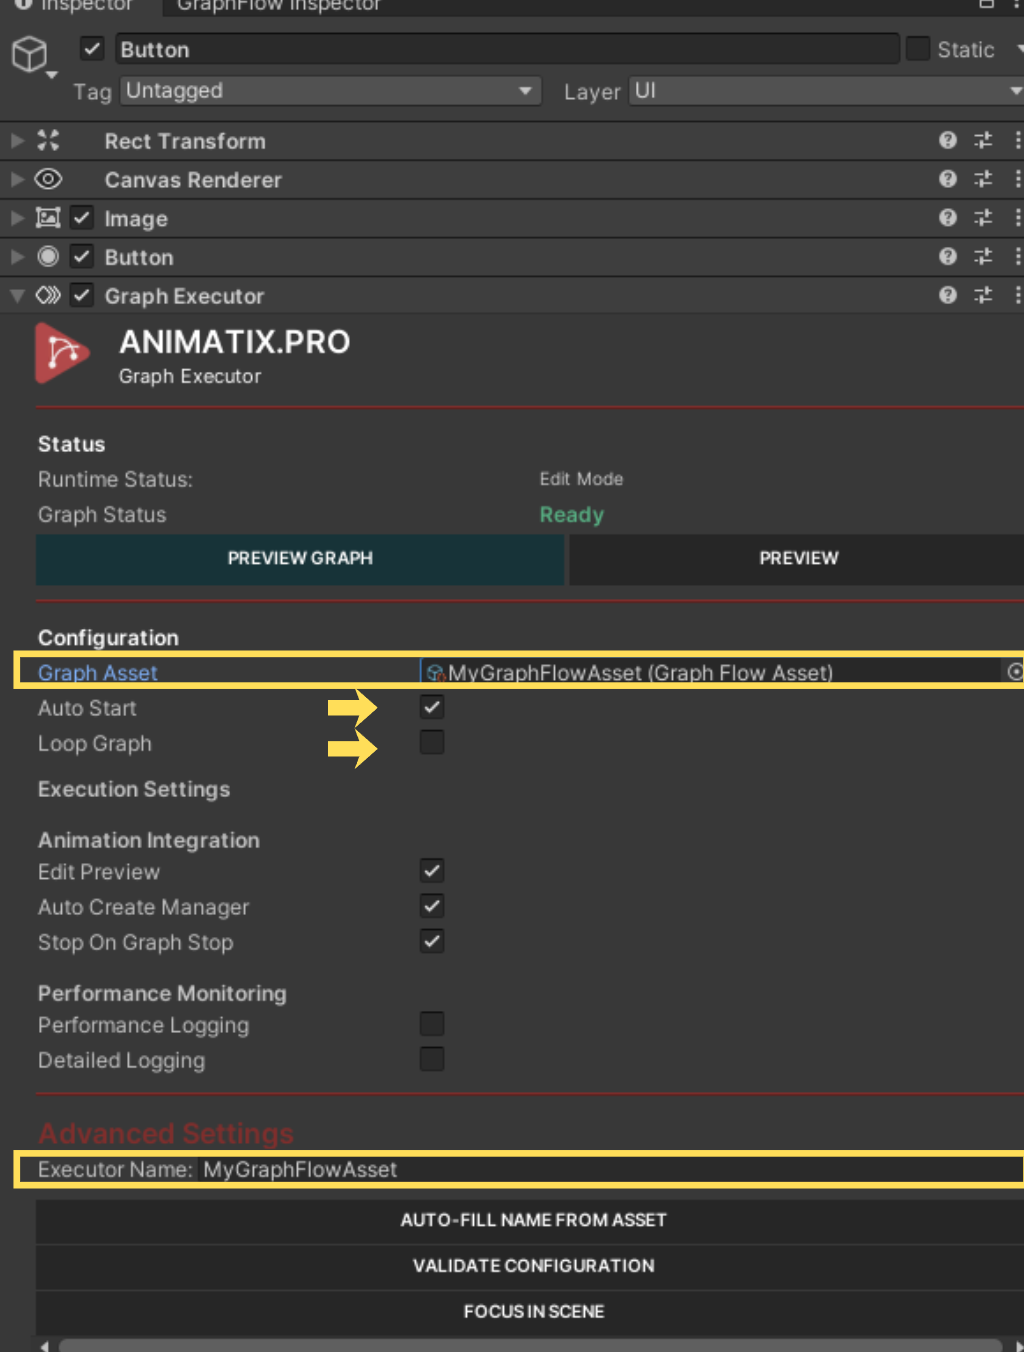
- Find the Graph Asset field
- Drag your
ButtonFadeInGraphFlow Asset from the Project window into this field- Or click the circle icon and select it from the asset picker
Important: The GraphExecutor automatically recognizes the GameObject it's attached to (your button) as the animation target. No additional target assignment needed.
GraphExecutor component with ButtonFadeIn asset assigned
Verify Settings:
Ensure these GraphExecutor settings:
- Auto Start On Enable: ✅ Enabled (animation will start automatically)
- Loop Graph: ❌ Disabled (animation plays once)
Save Your Graph
Before testing, click Ctrl + S (or Cmd + S on Mac) to save the GraphFlow Asset — unsaved graphs may not execute correctly in Play Mode.
Step 5: Test the Animation
Now you're ready to see your animation in action.
Run the Scene:
- Click the Play button in Unity's toolbar
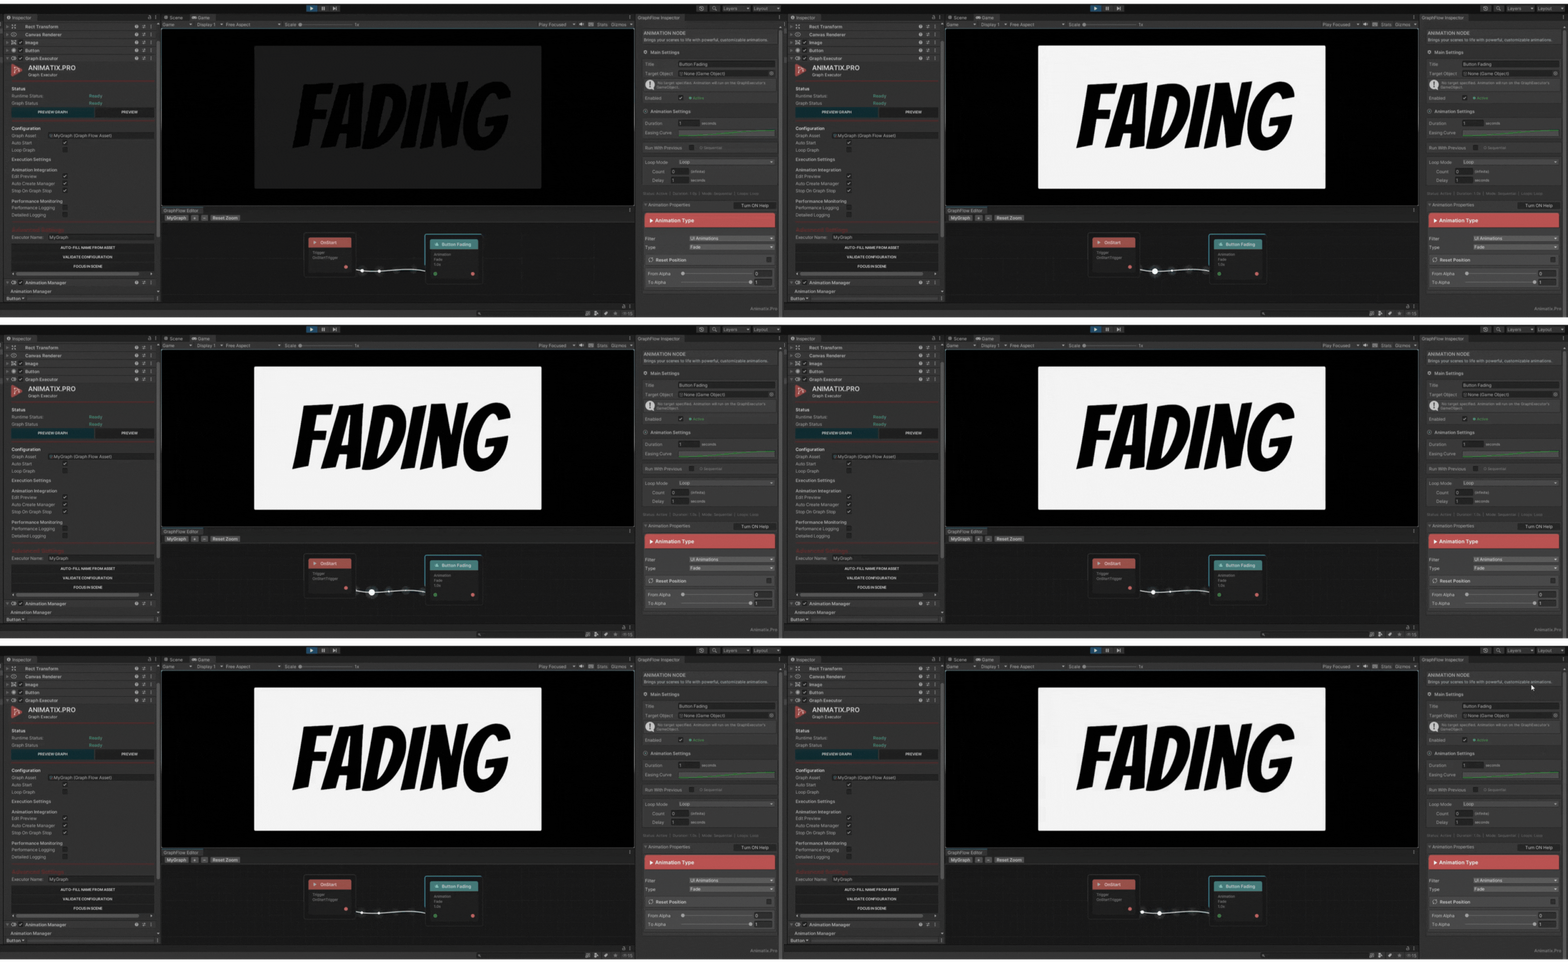
- Watch your button fade in smoothly over 1 second
What You Should See:
- Button starts invisible (alpha = 0)
- Button fades in smoothly over 1 second
- Button becomes fully visible (alpha = 1)
- Animation completes
Button fade-in animation in action
Expected Result
If everything is configured correctly, you'll see:
- Smooth fade-in effect — Button transitions from invisible to fully visible
- 1-second duration — Animation takes exactly 1 second to complete
- Automatic start — Animation begins when the scene starts (Auto Start On Enable enabled)
- Single play — Animation plays once and stops
Congratulations! You've created your first Animatix Pro animation. The button now fades in smoothly when the scene starts.
What You've Learned
In this tutorial, you've learned to:
- Create a GraphFlow Asset
- Add and connect nodes (Trigger → Animation)
- Configure animation properties (Duration, Fade values, Easing)
- Attach GraphExecutor to a GameObject
- Test animations in Play Mode
Next Steps:
- Experiment with different animation types (Slide, Scale, Rotate)
- Add more nodes to create longer sequences
- Try different triggers (On Button Click, On Key Press)
- Explore Core Concepts to understand graph structure better
Pro Tip: Try combining multiple animation nodes (e.g., Fade + Scale + Rotate) to create layered effects — all within a single flow.
Next: Interface Overview