Interface Overview
Understanding the Animatix Pro interface is essential for efficient workflow. This section provides a comprehensive overview of the GraphFlow Editor and Inspector windows, along with key interface elements.
GraphFlow Editor: Main Editor Window
The GraphFlow Editor is the heart of Animatix Pro — a visual node-based interface where you build and design your animations.
Opening the Editor:
- Double-click any GraphFlow Asset in the Project window
- The GraphFlow Editor opens in a new dedicated window
- You can have multiple editor windows open simultaneously
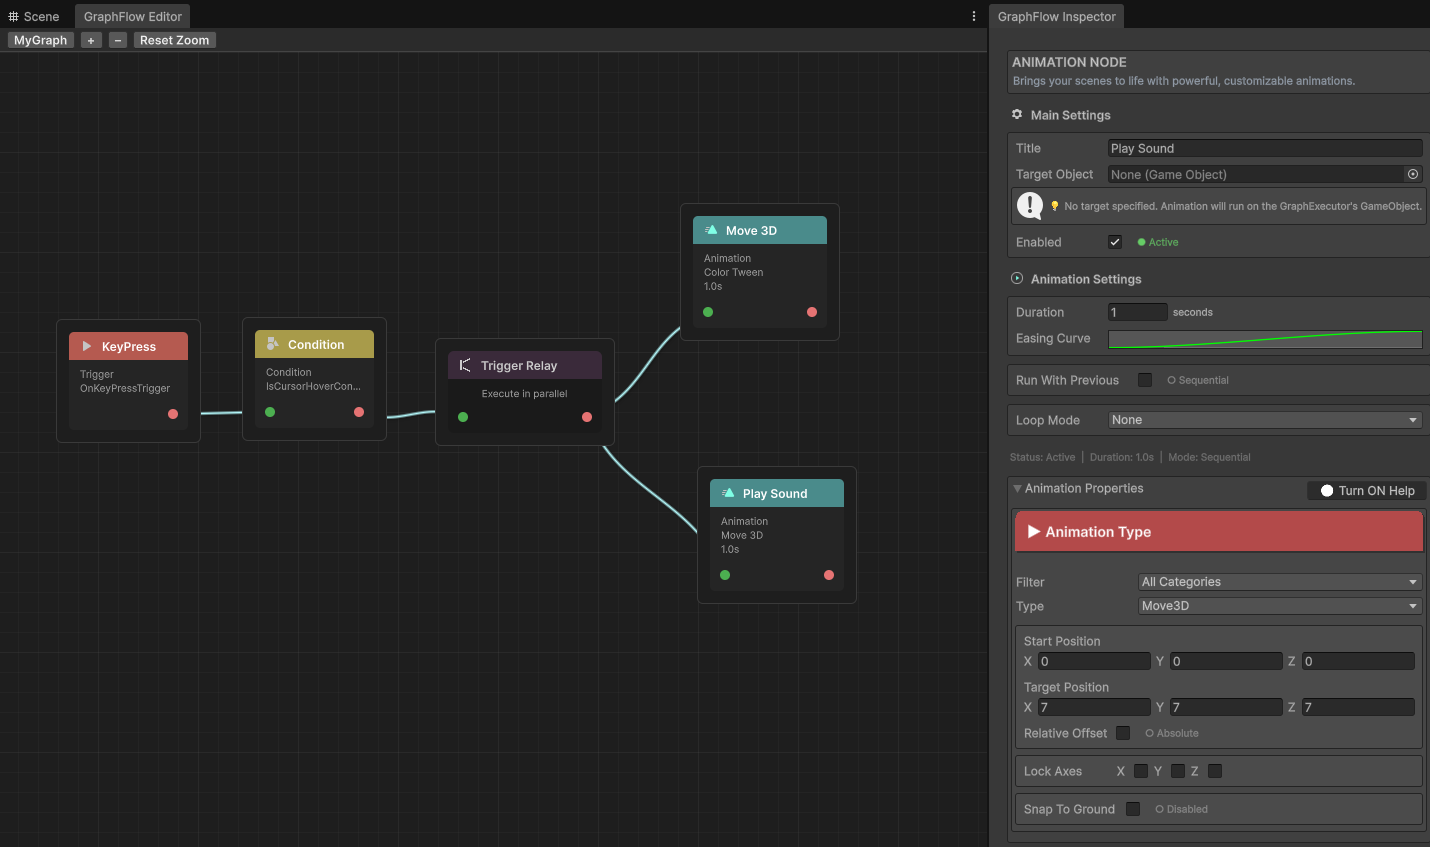
The GraphFlow Editor main window showing the node canvas and interface elements
Main Components:
The GraphFlow Editor consists of several key areas:
| Area | Purpose | Location |
|---|---|---|
| Graph Canvas | Visual workspace where nodes are placed and connected | Center of the window |
| Node Palette | Menu for adding new nodes to the graph | Right-click context menu or toolbar |
| Connection System | Visual lines connecting nodes to define flow | Drawn between node ports |
| Toolbar | Quick access to common actions (Save, Play, Zoom) | Top of the editor window |
| Minimap | Overview of the entire graph layout | Bottom-right corner (optional) |
Node Palette
The Node Palette provides access to all available node types for building your animations.
Accessing the Palette:
-
Right-click anywhere on the graph canvas
-
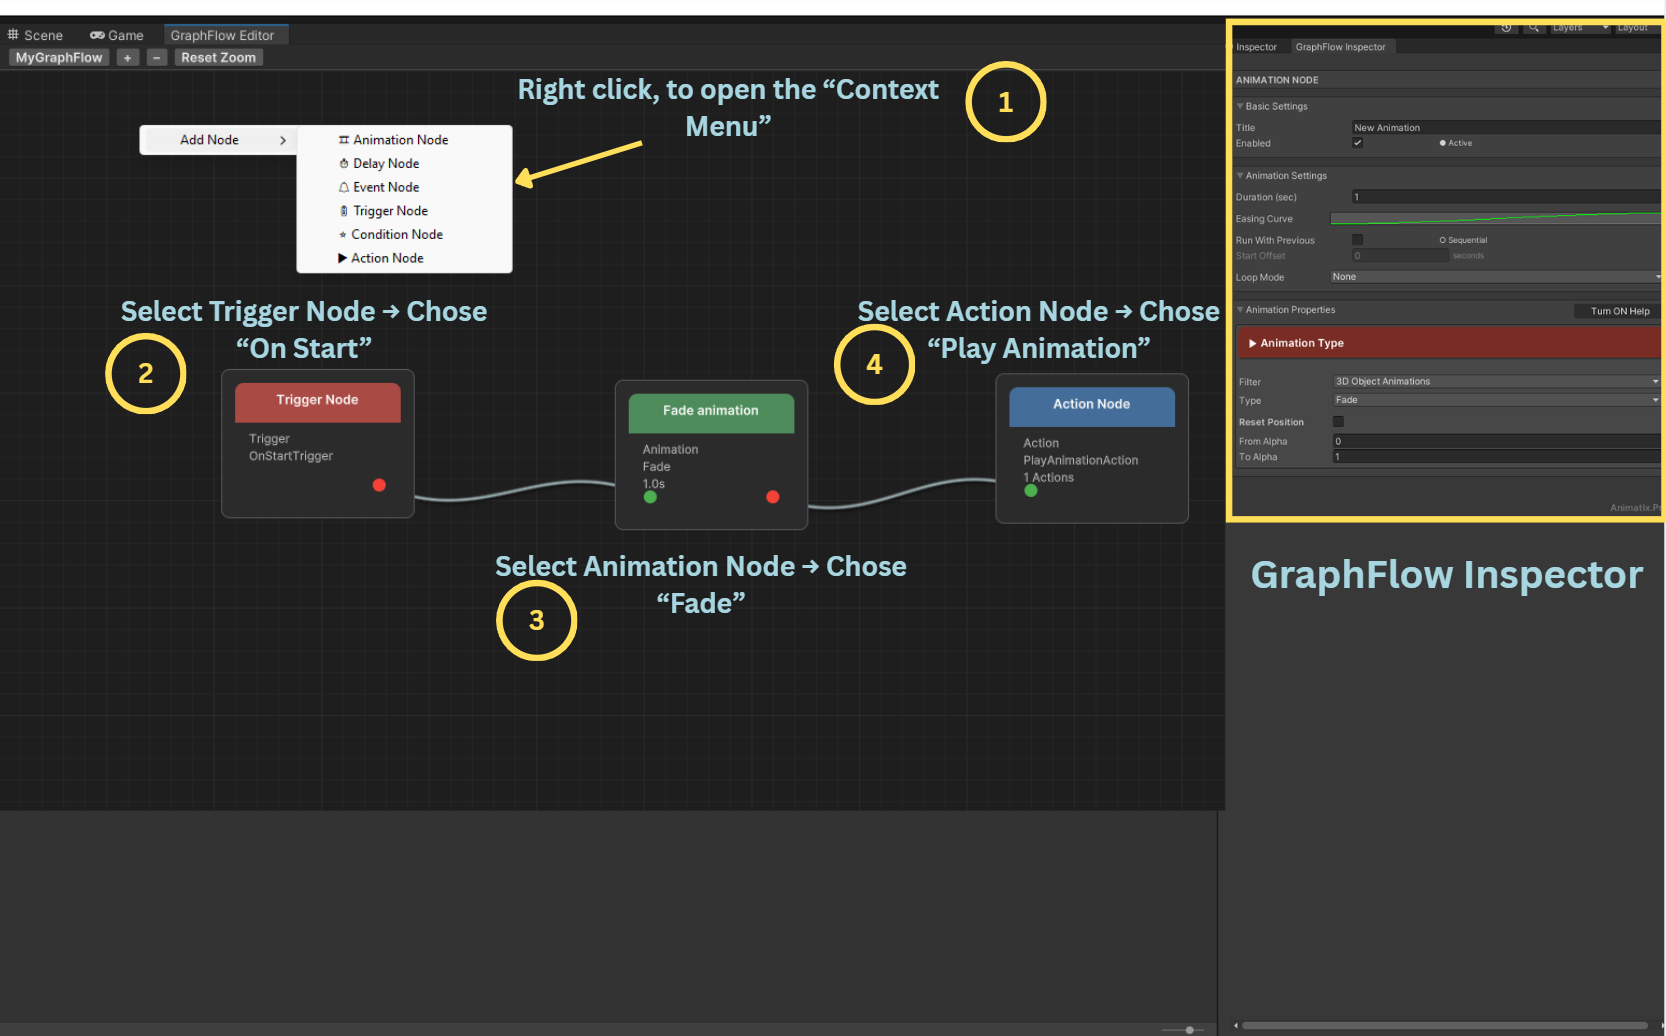
The context menu opens showing node categories:
- Trigger — Start points for animations (On Start, On Click, etc.)
- Animation — Visual effects (Fade, Move, Scale, Rotate, etc.)
- Action — System actions (Play Audio, Trigger Event, etc.)
- Event — Custom events and callbacks
- Condition — Logic and branching
- Delay — Timing controls
-
Navigate through categories to find the desired node
-
Click a node to add it to the canvas
Node Palette context menu showing available node categories

Node Categories:
| Category | Common Nodes | Purpose |
|---|---|---|
| Trigger | On Start, On Button Click, On Key Press | Initiates animation sequences |
| Animation | Fade, Move, Scale, Rotate, Slide, Bounce | Performs visual animations |
| Action | Play Audio, Trigger Event, Call Function | Executes system actions |
| Event | On Animation Complete, Custom Events | Handles callbacks and events |
| Condition | If Condition, Compare Values | Adds logic and branching |
| Delay | Wait, Pause | Controls timing and sequencing |
Connection System
The connection system visually links nodes together to define the animation flow and execution order.
How Connections Work:
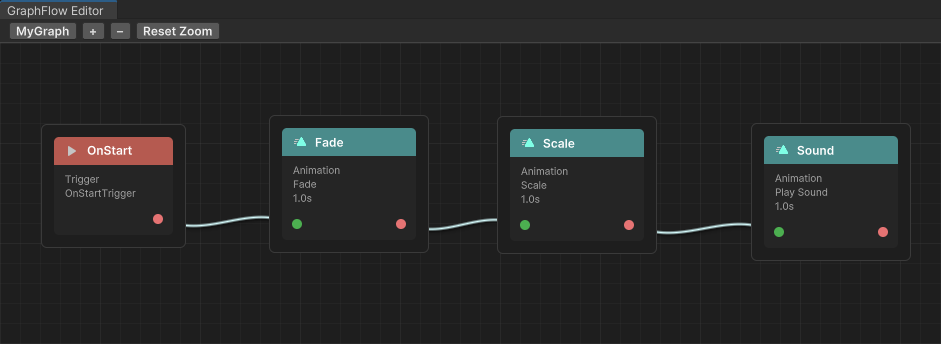
- Each node has input ports (left side) and output ports (right side)
- Connections flow from output → input (left to right)
- Multiple connections can originate from a single output port
- Connections define the execution sequence of your animation
Creating Connections:
- Hover over an output port (right side of a node)
- Click and drag from the output port
- Drag to an input port (left side of target node)
- Release to create the connection
Connection Types:
| Connection Type | Visual Style | Purpose |
|---|---|---|
| Execution Flow | Solid line | Defines execution order |
| Data Flow | Dashed line (if applicable) | Passes data between nodes |
Connection Controls:
- Click a connection to select it
- Delete key removes selected connections
- Right-click a connection for context menu options
GraphFlow Editor showing nodes connected via the connection system
Inspector Window: Node Properties
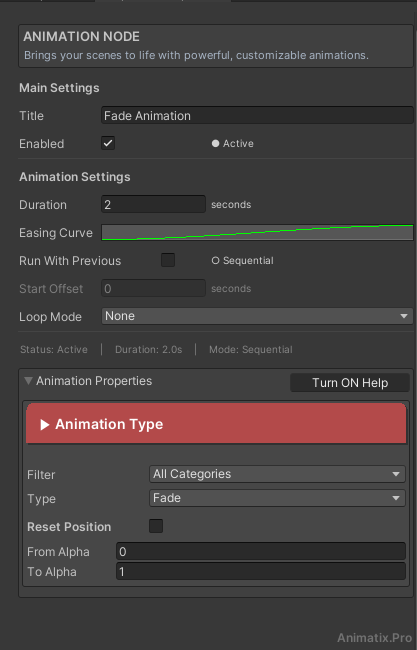
The Inspector Window displays detailed properties and settings for the currently selected node.
Accessing Node Properties:
- Click any node in the GraphFlow Editor to select it
- The Inspector window updates automatically
- All node-specific properties appear in the Inspector
Property Categories:
Node properties are organized into logical sections:
| Property Section | Common Fields | Purpose |
|---|---|---|
| Basic Settings | Duration, Delay, Playback Speed | Controls timing and execution |
| Animation Values | Start Value, End Value, Curve | Defines animation parameters |
| Target Settings | Target Object, Component Type | Specifies what to animate |
| Advanced Options | Easing, Update Method, Looping | Fine-tune animation behavior |
Inspector window showing Fade node properties and configuration options
Common Properties Explained:
- Duration: How long the animation takes to complete (in seconds)
- Delay Before: Wait time before animation starts
- Delay After: Wait time after animation completes
- Easing: Animation curve type (Linear, Ease In, Ease Out, etc.)
- Loop: Whether the animation repeats
Animation Curves and Preview Controls
Animatix Pro provides visual tools for editing animation curves and previewing results directly in the editor.
Animation Curves:
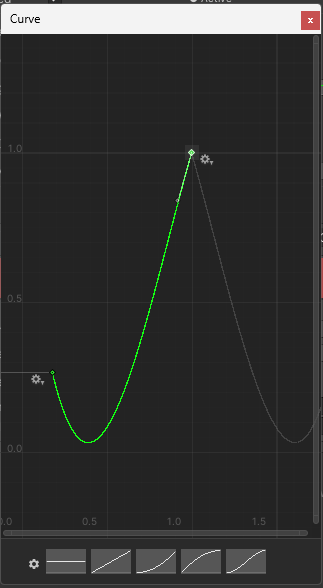
Many animation nodes support custom animation curves for fine-tuned control:
- In the Inspector, locate the Curve field
- Click the curve preview to open the Curve Editor
- Edit the curve by dragging control points
- Preview the curve effect in real-time
Common Curve Types:
| Curve Type | Visual Pattern | Use Case |
|---|---|---|
| Linear | Straight diagonal line | Constant speed |
| Ease In | Slow start, fast end | Natural acceleration |
| Ease Out | Fast start, slow end | Natural deceleration |
| Ease In Out | Slow start and end | Smooth, natural motion |
| Custom | User-defined shape | Precise control |
Animation Curve Editor showing a custom ease curve
Preview Controls:
The GraphFlow Editor includes built-in preview functionality:
| Preview Feature | Shortcut | Purpose |
|---|---|---|
| Play Preview | Spacebar or Play button | Test animation in editor |
| Stop Preview | Spacebar again | Stop preview playback |
| Reset Preview | R key or Reset button | Return to initial state |
| Step Forward | Arrow Right | Frame-by-frame advance |
| Step Backward | Arrow Left | Frame-by-frame reverse |
Preview Settings:
- Preview runs at real-time speed by default
- You can adjust playback speed in the toolbar
- Preview shows animation results directly in the Scene view
- No Play Mode required for basic preview
Key Interface Elements Reference
A comprehensive reference table of all interface elements, their purposes, and locations:
| Element | Purpose | Location | How to Use |
|---|---|---|---|
| Graph Canvas | Main workspace for nodes | Center of editor | Click to select area, drag to pan |
| Node Palette | Add new nodes | Right-click menu | Right-click canvas → Select node |
| Node Inspector | Edit node properties | Inspector window | Select node → Edit in Inspector |
| Connection Lines | Link nodes together | Between node ports | Drag from output to input port |
| Toolbar | Quick actions | Top of editor | Click buttons for Save, Play, Zoom |
| Zoom Controls | Adjust canvas zoom | Toolbar or mouse wheel | Scroll or use zoom buttons |
| Pan Tool | Move canvas view | Middle mouse or Space | Hold and drag to pan |
| Selection Tool | Select nodes | Left mouse click | Click nodes to select |
| Multi-Select | Select multiple nodes | Ctrl/Cmd + Click | Hold modifier key while clicking |
| Delete | Remove nodes/connections | Delete key | Select and press Delete |
| Undo/Redo | Undo operations | Ctrl/Cmd + Z / Y | Standard undo/redo shortcuts |
| Minimap | Graph overview | Bottom-right (optional) | Shows entire graph at a glance |
| Search Bar | Find nodes | Node palette | Type to filter node list |
| Property Search | Find properties | Inspector | Type to filter property fields |
Interface Tips and Best Practices
Navigation Efficiency:
- Pan: Hold Middle Mouse Button and drag, or Space + Left Mouse
- Zoom: Scroll Wheel, or Ctrl/Cmd + Scroll
- Fit to Screen: Double-click empty canvas, or F key
- Focus on Selection: Press F while node is selected
Organization:
- Group Related Nodes: Place connected nodes near each other
- Use Comments: Right-click canvas → Add Comment for notes
- Color Coding: Use node colors to organize by function (if available)
- Clean Layout: Regularly arrange nodes for better readability
Workflow Optimization:
- Keyboard Shortcuts: Learn shortcuts for faster editing
- Multi-Select: Select multiple nodes to move together
- Copy/Paste: Ctrl/Cmd + C/V works for nodes and connections
- Save Frequently: Ctrl/Cmd + S saves the GraphFlow Asset
Complete GraphFlow Editor interface with all elements visible